Article featuring DIY installation of our pool enclosure Laguna. Taken from website: http://www.jlconline.com/
"The real challenge: She wanted to use the outdoor pool year-round in central Maine. I knew that there are rolling, telescoping covers for such an application, but I had never seen or installed one. After shopping around, I chose a shelter that is manufactured in the Czech Republic and supplied in the U.S. by Pool and Spa Enclosures (based in Monmouth, N.J.). Once I had selected a model whose dimensions matched the proposed pool, we worked out the design details for the pool and deck. The client involved an architect, David Merritt, who was able to take her vision and my details and create some drawings that allowed all of us to see what we were talking about. The local building official approved the plans, and I began the project..."
Building the Shelter
"The telescoping shelter arrived at the jobsite in a 53-foot box trailer on an 8-by-19-foot shrink-wrapped pallet, with the components packaged by element and individually shrink-wrapped. I had a tilt-bed wrecker on hand to offload the pallet. The driver hooked his cable to the pallet and slid it onto the tilt bed, then drove to the pool area and offloaded it.
Once I had inventoried all the parts and pieces and set the track, I was ready to install the enclosure. I built an elevated, temporary platform adjacent to the deck, set slightly below the finished deck height so that the enclosure sections would offload from the pallet right onto the 1/2-inch plywood that I had placed temporarily to protect the finished decking. I called the wrecker back, and the driver pulled the pallet back onto his truck.
The tilt bed backed up to one end of the staging. I drove my Kubota to the opposite end and slowly dragged the one-ton pallet onto the staging. I removed the shrink wrap protecting the outer element, and slid it onto the plywood and then into the end of the track, slipping its four metal casters (two on each side) into the slots on the track. Walking from side to side, I worked the casters into the tracks.
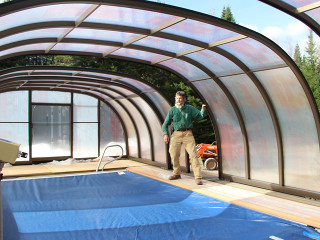
Next, I installed the retaining pins that hold each element in its closed position, and then I applied the ends. Everything was predrilled and fit perfectly. I am impressed with both the engineering and the finish of the product. The sweeps and gaskets are substantial, and I expect the unit to perform well. On a sunny day with November temperatures below 50°F, one needs to open a door or slide an element out of its closed position to not feel overheated. Even on a cloudy, cool day, the heat from the pool is captured and one can still be comfortable in shirtsleeves.
I had hoped I would have the enclosure in place before the snow came for the season, and I have done that. Once the hand railing, the steps, and the kitchen area are in place, I’ll leave this project until the spring, when the patio and fire pit can be completed."


